Basic Knot Terminology
Knots are usually tied in the end of a rope. The part of the rope away from the end is called the standing part, while the part towards the end is called the running part. A rope bent into a "U" shape is called a bight, whereas a rope that crosses back over its standing part is called a loop.

Bowline Hitch
The Bowline Hitch (Pronounced: "bowlin'", rhymes with "bowling") is a loop knot that does not close up when you put a strain on it. Like all good nautical knots, it can be undone easily even after it has held a lot of strain.
On Victoria the Bowline is used to secure the bowline of the dinghy to the loop in the mooring line on the Victoria.

a) Start with a bight in the rope.
b) Then, make a loop in the standing part
c) Now, thread the running part through the loop, coming up on the OPPOSITE SIDE of the loop to where the other end of the bight. (If the other side is under the loop, pass the running part over, and vice-versa).
Now "The rabbit comes out of the hole...
d) Goes around the tree
e) And goes back into the hole."
Hint: Do not come back out of the hole the same way you came out, but go back in the opposite way!

Timber Hitch
The Timber Hitch is tied around an object, like a furled sail. It is very quick and easy to tie, it closes up under strain, like a lassoo, and it comes undone very easily as soon as the strain is released.
a) Pass the rope around the object, and cross the running part over/under the standing part.
b) Double the running part BACK in the direction from which it came, and pull it snug.
c) Tuck the end under the running part two or three times, and pull snug.
Hint: Do not tuck the end under the standing part, but back under the running part.

To furl a sail, start with a timber hitch near one end, then do a series of Marling Hitches along the length of the sail, and finish off with another timber hitch.

The Figure Eight Knot
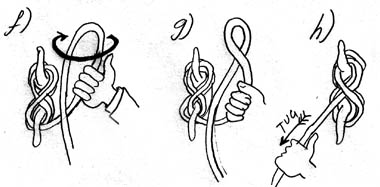
This is a Stop Knot to stop a rope end from going through a hole. On Victoria it is used to stop the Jib Sheets from un-reeving through the Jib Sheet Blocks. To tie, hold a bight in the hand (a), then apply a half-turn twist (180 degrees) to the top (b), then apply a second half-turn twist (c), and finally tuck the end up through the bight at the top (d). The result should look like a figure "8". Be careful — if you started with the bight the other way, as in (e), then you must either pass the end through from the back side (f), OR, you have to apply a THIRD twist, OR you should apply the two twists in the opposite direction. Alternatively, you can just reeve the Figure 8 shape directly, as in (d).

Belaying To A Cleat
There are several Cleats aboard Victoria to Belay (Pronounced: "B'lay") a rope to. The first part is easy, just take a bunch of figure 8 turns around the cleat. The last turn should tuck under itself as in (a), but NOT as in (b), which is not as secure, because the final tuck is not over the fat part of the coiled rope.

The last tuck is easy to do at the end of the rope, but it is more tricky when the rope is long, and you don't want to thread the whole length under the tuck. In that case, the following procedure works every time. After several turns of figure 8's. (not too many — leave room on the cleat) (a), on the way up again (the final turn should be over the top and down, for the haliard cleats on the mast) IMAGINE doing the final turn STRAIGHT over the top as in (b), i.e. NOT in figure-8 fashion. Hold a bight in position for this (c), but before you hook it on, apply a twist INWARDS (see arrow at (c)) i.e. standing part towards you, moving across the cleat, to produce a half-twist (180 °) as in (d). Hook that twist over the top of the cleat, and tug on the running part (e).

When coming up on the OTHER side of the cleat (f), again, twist the final bight INWARDS (standing part towards you, moving across the cleat) and hook it on as before (g) and tug (h). It works every time!
Two Half Hitches, or, Round Turn and Two Half Hitches
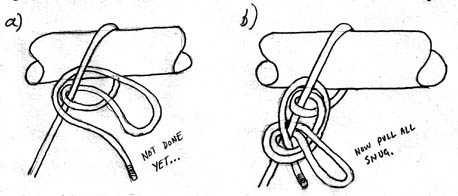
This knot is very useful for securing the boat to a dock, or for securing the SaltSwarther © (rain cover) on Victoria. It is one of the simplest knots to learn, the only common error being when the two hitches are not made identical, which they should be. The most secure knot begins with an [optional] round turn around the spar (a). This should be a full turn-and-a-half. Then, the running part is passed EITHER over the top and up through the hole (b), OR under the bottom and down through the hole (c). Either one is equally acceptable as a single half hitch. However, whichever one is chosen, the SECOND half hitch should be made in like manner, as shown in (d) and (e) respectively. In no case should the two half hitches be made differently, otherwise the knot will not be secure. I find it useful to mutter "over the top and up through the hole" (or whichever) quietly under my breath as I tie the knot, especially when you pull the first one tight, which makes it appear quite different.

When tying up to a dock, this knot is often more convenient tied "on the bight", that is, using a bight of doubled rope to tie the knot, as shown below (a), and (b). This is most useful when there is excess rope to deal with. Pull each hitch snug.
Sea Gasket Coil
The Official Coil on board Victoria.
Whenever the crew is idle for any length of time, and when loose lines (that means ROPES for you Landlubbers!) are observed on deck, every hand should immediately COIL THEM UP!
Always coil CLOCKWISE (or "with the sun") because in the days of the ol' square riggers, rope was RIGHT LAID, that is, twisted CLOCKWISE when moving along the rope, which meant that the rope would get all kinked and twisted if you coiled it the wrong way.
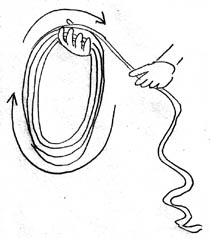

NEVER MIND that the rope on Victoria is mostly braided rope where it makes no difference which way you coil it, it makes a difference to ME and to Admiral Nelson! So lets keep it CLOCKWISE or I'll have you keel hauled!
Now the trick to persnickety coiling is to TWIST each coil as you lay it, between the thumb and forefinger of the coiling hand (left hand usually) to make it lay straight. Too much twist, and it turns INWARD (a), whereas not enough twist and it turns OUTWARD (b). Just the right twist and it lays nice and neat against the previous coils, as in (c). Now the proper twist imparted to each coil eventually accumulates a twist in the uncoiled rope, which tends to get pretty kinky. So you have to shake out the excess twists by swirling the uncoiled rope, as shown in (d), to pass the twists further down the rope and eventually off the end.

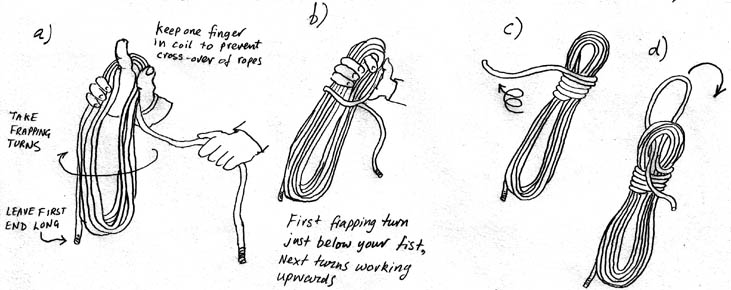
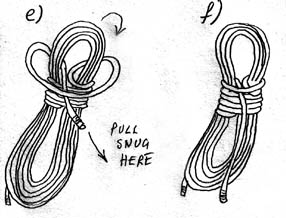
When the rope is mostly coiled, and with a certain amount of rope left (judgment required) hold the coil in the right hand as shown in (a), with an index finger holding your place at the center of the coil, and coil the remaining rope in "frapping turns"— the first frapping turn taken just below your fist (b), the subsequent turns on top of the first one, working upwards (c). While there is still sufficient rope left (leave more than you would think!) finish off by taking a bight of the end of the rope through the head of the coil (d),
Clove Hitch
The Clove Hitch is used to secure a line to a spar or rail. On Victoria it is used to secure the SaltSwarther © to the cabintop handrails, or to secure the fenders to the cabintop handrails (see (d) below).
(a) Loop the rope around the spar, then cross OVER the standing part (b) and take a second turn around the spar. Finally, pass the end back up under the crossing turn (c). Beware! This knot is only secure while there is tension on it. It is easily adjusted, for example to adjust the height of the fender (d). A good location for the fender is between the shroud and backstay, as depicted.

Square Knot
The Square Knot is used on Victoria to secure the collar of the SaltSwarther © around the mast (a). This knot is not safe unless tied around an object like the mast or a spar. It has the advantage that it secures two ropes coming from opposite directions snugly.
Begin with an Overhand Knot (b), then tie a second overhand knot on top of the first, but be sure to make it symmetrical, as in (c). This means the second knot is made "backwards" relative to the first one; in this case, the left rope goes over then under the right rope, but in the second knot, that same rope (now on the right) goes under then over the other one. On no account should it be made the other way (d) because this is the dreaded GRANNY KNOT tied only by LANDLUBBERS because it is not secure, and can slip.

Basic Nautical Terminology
Parts of the Boat
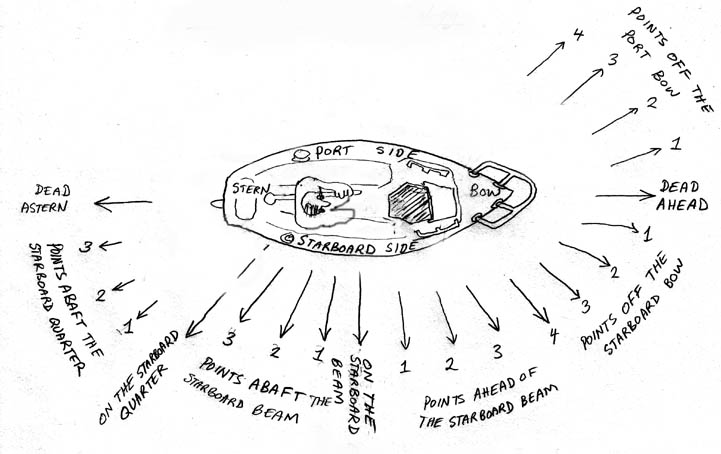
The front of the boat is the Bow, the back of the boat is the stern. The right side is the starboard side (when you are facing forward), and the left side is the port side. If you turn around and face the stern, then your right hand points to the port side of the boat, and your left hand points to the starboard.
The cockpit is the part where you sit on the bench seats. The cabin is the covered internal space up front. The deck at the bow is called the fore deck, and it has a pulpit rail. The deck at the back is the poop deck. It has a poop hatch, or lazarette. There are winches on port and starboard sides, to help pull in the jib sheets. There are two "torpedo tubes" under the bench seats, which can be accessed through the cabin. These can be used for sleeping berths. They are also used for storage. Sails are stowed in the port side torpedo tube, the "shore box" and the oars are stowed in the starboard side torpedo tube. The shore box is a box we bring on board with us to go sailing, and take ashore at the end of the sail. That is a good place to stow wallets, watches, and other items you want to be sure not to forget on board.
The boat is steered by the rudder, which is controlled by the tiller. If you turn the tiller to starboard, the rudder will turn to port, which will make the boat turn to port. In other words, the boat turns in the direction opposite to the direction you push the tiller. The old-fashioned nautical term "helm a-port" means push the helm itself to port, which turns the rudder to starboard, and thus turns the boat to starboard. The modern navy term for "Helm hard a-port" is "Rudder hard a-starboard", or just "Turn hard a-starboard". Both ancient and modern terminology are recognized on board Victoria.
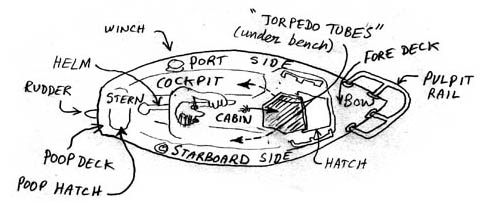
The foreward direction is called Fore'ad, or Dead Ahead, the backward direction is called Aft, or Dead Astern. The direction to starboard is called On the Starboard Beam, the direction to port is called On the Port Beam. Points between these four cardinal directions are described in "points" of the compass, where each point is one 32nd of a circle. There are 8 points in 90 degrees, or 4 points in 45 degrees. So, for example, starting dead ahead and going clockwise, we have 1, 2, 3, and 4 points off the starboard bow, then 4, 3, 2, and 1 points ahead of the starboard beam, then broad on the starboard beam, followed by 1, 2, 3, points abaft (aft of) the starboard beam, then on the starboard quarter, (the same as 4 points abaft the starboard beam), and finally, 1, 2, and 3 points abaft the starboard quarter, and we get to dead astern. And similarly to port.
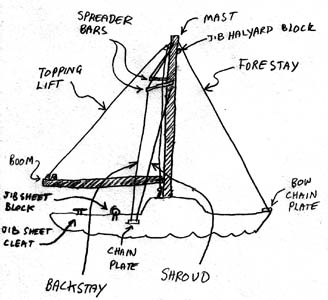
The Mast is supported in front by the Forestay, and in back by the Shrouds and the Backstays. The shrouds attach directly to the mast, but not all the way up, whereas the backstays pass through Spreader Bars to the very top of the mast. The Boom is the horizontal spar that stretches out the foot of the sail, and is supported by the Topping Lift when the sail is not set.
Sails
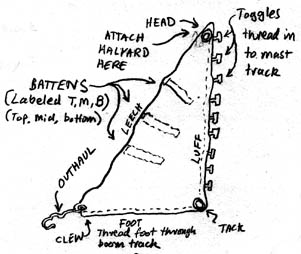
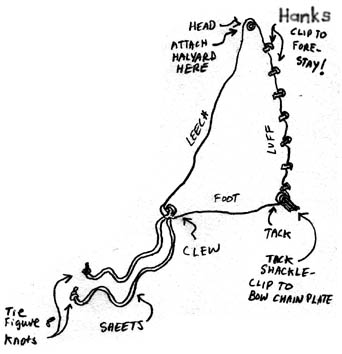
Sails have three sides: Foot (bottom), Luff (front), and Leech, and three corners: Head (top), Tack (front), and Clew (rear corner). Sails are raised up using the Halyards, (or Halliards) and their tension is controlled by their Sheets. The main halyard is belayed on the starboard side cleat on the mast, the jib halyard is belayed on the port side cleat.
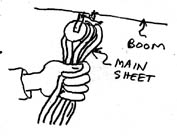
The tension of the sails is controlled by the sheet. The main sheet is a block and tackle rigged between the end of the boom and the stern of the boat. The main sheet has a jam-cleat that holds any tension that is pulled, but can be released by jerking the sheet upward out of the jam cleat. The jib sheet is hauled taut with the help of a winch, and belayed to a cleat.
Mains'l
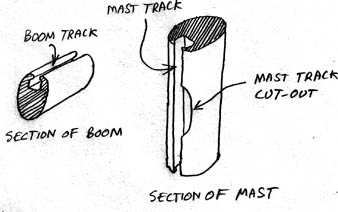
The foot of the mainsail is threaded through a Boom Track, a groove on the top of the boom, and the clew is secured aft by the Outhaul. The luff of the mainsail is fitted with Toggles that slide in the Mast Track, a groove in the after side of the mast. The toggles can only be removed from the mast track at one point the Mast Track Cut-Out, near the main halyard cleat.
Heads'l
There are two "headsails" to choose from on Victoria, the jib, and a larger Genoa. The jib is smaller, for sailing in strong winds, whereas the Genoa is large (bigger even than the mainsail), and is used in very light winds. When the genoa is set, it is often referred to more generally as the "jib".
The tack of the Jib (or Genoa) is secured to the fore'ad chain plate, and the luff of the jib is attached to the forestay with a series of Hanks. The jib has two Sheets that are used one at a time, one for the port tack, and the other for the starboard tack. The sheets are rove outboard of the shrouds, through the sheet blocks (pulleys), around the jib sheet Winches to port and to starboard, and finally one sheet is secured to the jib sheet cleats, the other is left loose. The winches have a one-way ratchet that allows them to turn clockwise only, so the jib sheet should always be wound clockwise 2-3 turns around the winch.
Points of Sail
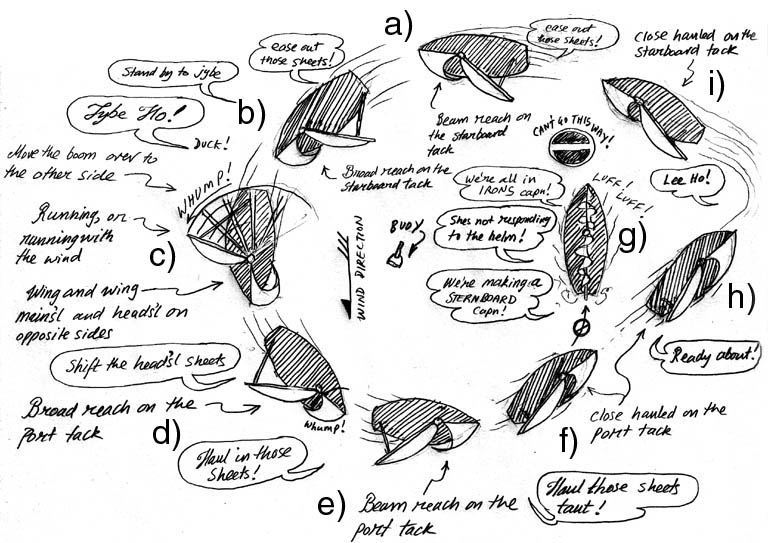
A sailboat is configured differently depending on the direction of the wind. Generally, the sheets are pulled in tighter when sailing close to, or "against" the wind (as close as you can), which is called Close Hauled, and they are let out when sailing with the wind, or Running. You can practice all the different points of sail by sailing a circular course around a fixed landmark, like a buoy or lobster pot, as depicted below.Starting at the top-center of the picture, (a), and working counter-clockwise, the boat begins on a Beam Reach on the Starboard Tack (wind coming from the starboard beam).
(b) The sheets are let out as she turns to leeward, for a Broad Reach on the starboard tack.
(c) As the boat turns directly down wind, the boat is Jybed by passing the mains'l over to the other side to the command "Jybe Ho!". The boat is now Running, or Running With the Wind, in this case she is Wing On Wing, with jib to one side, and mains'l to the other.
(d) Next the heads'l (Jib or Genoa) is shifted to the other side. Now she is on a Broad Reach on the Port Tack.
(e) The sheets are hauled in further for a Beam Reach on the Port Tack.
(f) Now the sheets are hauled in for Closed Hauled on the Port Tack.
At this point, if the boat turned further left, straight into the wind, (g), she would lose all her headway, and fall Into Irons, dead in the water, all sails Luffing (flapping noisily), and totally out of control. To avoid this condition, continue close-hauled (h) until you can tack all the way round to close hauled on the starboard tack, (i), which will bring us back up to where we started on a beam reach.
Additional Terminology
On Victoria, in order to avoid confusion and ambiguity, when backing
the jib, the language "Back the jib on the port [starboard]
clew!" means haul in on the port [starboard] jib sheet to set
it aback. This is clearer than the more standard terminology "Back the
jib on the starboard [port] tack" as a command for hauling the port
[starboard] sheet, which requires more mental reversals for a
maneuver where fast action is often required.
On the command "Ready About", FIRST remove the jib sheet from
its jam cleat and hold in your hand without releasing the
tension. THEN reply "Ready about!" and wait.
On the command "Lee Ho!" let fly the jib sheet and make sure it runs
free, then turn around and grab the jib sheet on the other side, wrap
it around the winch 2-3 turns CLOCKWISE (because there is a one-way
ratchet that only allows clockwise rotation) but DO NOT HAUL TAUT;
wait until the bow crosses the eye of the wind onto the new
tack. Since the jib, with both sheets free, flutters to leeward like a
flag, it crosses the foredeck from one side to the other as the bow
crosses the wind. So as soon as the jib crosses past the mast, THEN
haul taut on the new tack.
Make sure she fills with wind. If she fills Aback (on the
wrong side) then LET OUT THE SHEET IMMEDIATELY, and wait till she can
fill properly before hauling taut again. DURING THE TACK, KEEP YOUR
HEAD DOWN as the boom crosses overhead from one side to the other. On
the new tack, wait till the helmsman has steadied on the new course,
then trim the jib sheet and belay. That means, ease it out slowly
until it just begins to Luff (flutter), then pull it in until
it stops luffing, and then give it one more little pull. If the front
of the mainsail develops a concavity, the jib is pulled too tight (OR
the mains'l sheet is not pulled tight enough)
When the bow is pointed straight into the wind, for example while
tacking, the boat can lose all way (forward speed) and the helm goes
limp. This can happen when tacking in very light winds, when the boat
has insufficient forward momentum, or when tacking in very high winds,
where the way is lost going straight into the strong wind. At this
point, the boat can be made to fall off to one side or the other by
Boxing Off, that is, backing the jib to one side, which makes
her head fall off to the other side.
For example consider position (g) above, with the boat all in
irons. She could be made to continue through the eye of the wind by
calling "Back the jib on the starboard clew!" to box the bow
off to port. Also, if the boat starts to "make a sternboard" (drift
backwards) the helm will work in reverse, so it is imperative to
"shift the helm" to the other side, i.e. turn helm a-port (rudder to
starboard) to box off to port. Alternatively, the recovery from
(g) could be made by falling off onto the original tack, with
the command "Back the jib on the port clew!" to box off the bows to
starboard, and shift the helm to starboard (port rudder) if she makes
a sternboard.
The crewman manning the jib during tacking, right after the command
"Lee ho!", should be always ready for instant action if they hear the
command "Back the jib!", because a moment of hesitation will make it
too late. In conditions of very light, or very strong winds, when the
captain suspects there may be trouble going about, the command
sequence would be: "Ready about, prepare to back the jib!" followed by
"Lee ho!", then "Back the jib [on the port or starboard clew]!", then
after the bow passes through the wind, "Front the jib!" (to make it
fill afront on the new tack).
Starting with the boat on a broad reach (a), turn to head
exactly to leeward. Then shift the heads'l (jib or
genoa) to be wing-on-wing (b). Note how the big asymmetric
thrust of the mains'l at (b) requires helm to the opposite
side just to hold the boat straight.
The boat is not sailing exactly to leeward (b). If turned TOO
FAR, the boom will jybe unexpectedly, jerk hard on the gear, and maybe
hit someone on the head as it swings. If the boat is not turned FAR
ENOUGH, the sail will refuse to go aback, and will return to the
original side. Pick a good heading reference on the horizon before
the maneuver, and keep an eye on that point throughout the maneuver.
It is hard to haul the jib aback against a stiff breeze, and can be
hard on the gear. The easiest way to heave to is to Heave
About, that is, to simply tack (turn up into the wind and beyond)
without shifting the jib to the new tack, thus it comes up
aback on the new tack and the boat stops dead on the spot. The
commands are: "Stand by to heave about!" and "Heave about!"
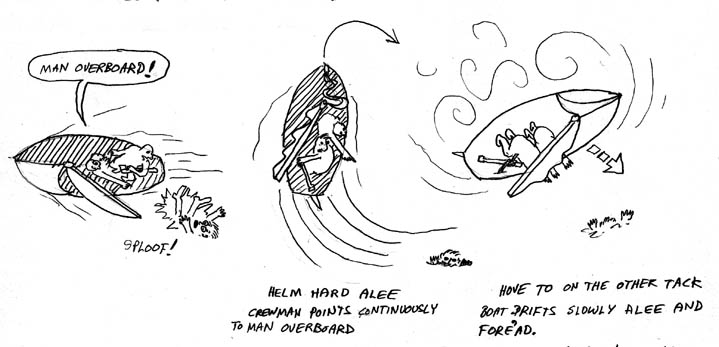
Helmsman: TURN AROUND IMMEDIATELY! Do not keep sailing straight! Toss
a life jacket or float into the water if you can for the swimmer to
grab on to. Do not plan a long tack to get back to the swimmer, but a
series of short tacks, to remain close so as not to lose sight of them.
To turn the boat around, the best way is to Heave About, that
is, Tacking WITHOUT shifting the heads'l sheet. In other words,
just turn around to windward, and leave the jib sheet where it
is. This is best done when already to windward of the swimmer, so as
to drift back down to them when hove to.
If necessary, the helmsman can lash the helm to leeward to help haul
the man aboard. This is most easily done on the leeward side where the
rail will be closer to the water. All crews MUST practice this
procedure periodically, using a fender or float to simulate the man
overboard. Have the crewman man the helm and sheets as if they were
alone.
Continue on to Victoria Captain's
Manual for more salty information!
Operating the Jib Sheets for Tacking
Boxing Off and Shifting the Helm
Operating the Jib Sheets for Jybing
Common Errors
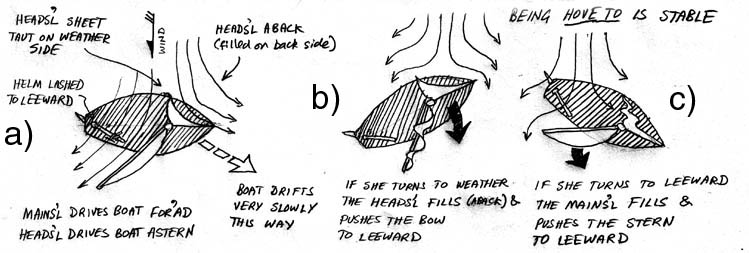
Heaving To
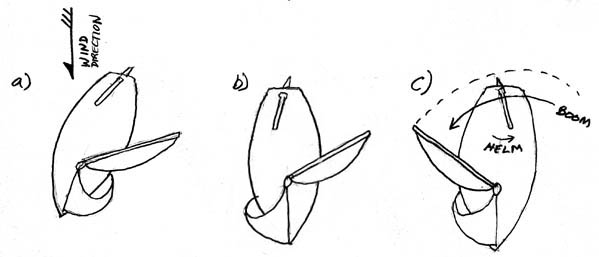
Heaving To means to stop dead in the water. One way to do this is to
just let all the sheets out, and let the sails luff, spilling their
wind. A more salty nautical way is to BACK THE JIB (haul the
weather sheet taut) (a). This spills wind foreward,
driving the boat backwards, while the mains'l spills wind aft, driving
the boat foreward. You can even lash the helm to
leeward and she will drift very slowly to leeward in a stable manner.
She is stable because she always weathervanes into the wind. If she
turns up to windward, (b), the jib fills aback, and pushes the
bow back to leeward. If she turns to leeward, (c), the mains'l
fills with wind, and turns her back up to windward. So she tends to
turn gently side to side, first filling the jib, then the mains'l, and
then back again. The exact direction of drift can also be controlled
by the helm.
Heaving About
Man Overboard Procedure
If someone accidentally falls overboard, EVERY member of the
crew MUST be capable of turning the boat about and picking them up,
single handed if necessary. MOST IMPORTANT do not lose
sight of the man in the water, even for a moment! If a second hand is
available, that is their PRIMARY task, to point continuously at the
man in the water while the helmsman steers and turns the boat around.
